Kubernetes Resources and Scaling: A Beginner’s Guide

Kubernetes is the go-to platform for deploying and managing containerized applications. Its power lies in its ability to automate container lifecycle, scaling, and networking. But a key aspect that often gets overshadowed is its robust resource management capabilities.
Efficient resource allocation ensures applications run smoothly, prevents resource hoarding, and maximizes cluster use. This translates to better performance, cost savings, and healthier applications overall.
CPU and Memory: The Pillars of Resource Management
At the heart of Kubernetes' resource management lies the concept of resources. These define how much CPU, memory, and other computing power a container needs to function. By understanding these resources and how to manage them, we can help Kubernetes optimize cluster utilization, preventing bottlenecks and delivering better application health at a lower cost.
The two primary resources managed in Kubernetes are CPU and memory.
- CPU (Central Processing Unit)
- Memory
- For powers of 10: M for megabytes, G for gigabytes, and so on.
- For powers of 2: Mi for mebibytes, Gi for gibibytes, and so on.
This refers to the processing power a container needs. CPU resources are measured in units equal to a single CPU core (physical or virtual).
These units are an absolute amount of resource, not relative, meaning they always request for a specific amount of processing power and not a proportion of the machine's cores, which can depend on the machine having a single or multiple cores.
You can request fractional amounts (like 0.5 for half a core) in either decimals (0.1) or milliCPU format (100m, which means the same).
Specifying less than “1m” or “0.001” units is not allowed by Kubernetes, and in order to avoid accidentally specifying such invalid amounts it is recommended to use the milliCPU form when requesting less than 1 CPU unit. Since it's easier to spot “0.5m” as an invalid amount rather than “0.0005” CPU units.
This defines the amount of Random Access Memory (RAM) required by a container for its operations, and it is measured in bytes.
You can specify this amount using numbers followed by letters to abbreviate large quantities. There are two main sets of abbreviations:
Be careful with the case of the abbreviation (uppercase M vs lowercase m). If you ask for 400m of memory, you're really asking for just 0.4 bytes, which is probably not what you meant. It's likely you meant 400 mebibytes (400Mi) or 400 megabytes (400M).
Limits and Requests: Setting Boundaries
When defining resources for a container, you specify two crucial parameters: Limits and Requests.
- Limits: This acts as a hard cap on the resources a container can consume. Exceeding the limits can lead to the container being throttled or even terminated.
- Requests: This indicates the minimum resources a container is guaranteed to be allocated. Kubernetes tries to ensure these requested resources are available for the container to function properly.
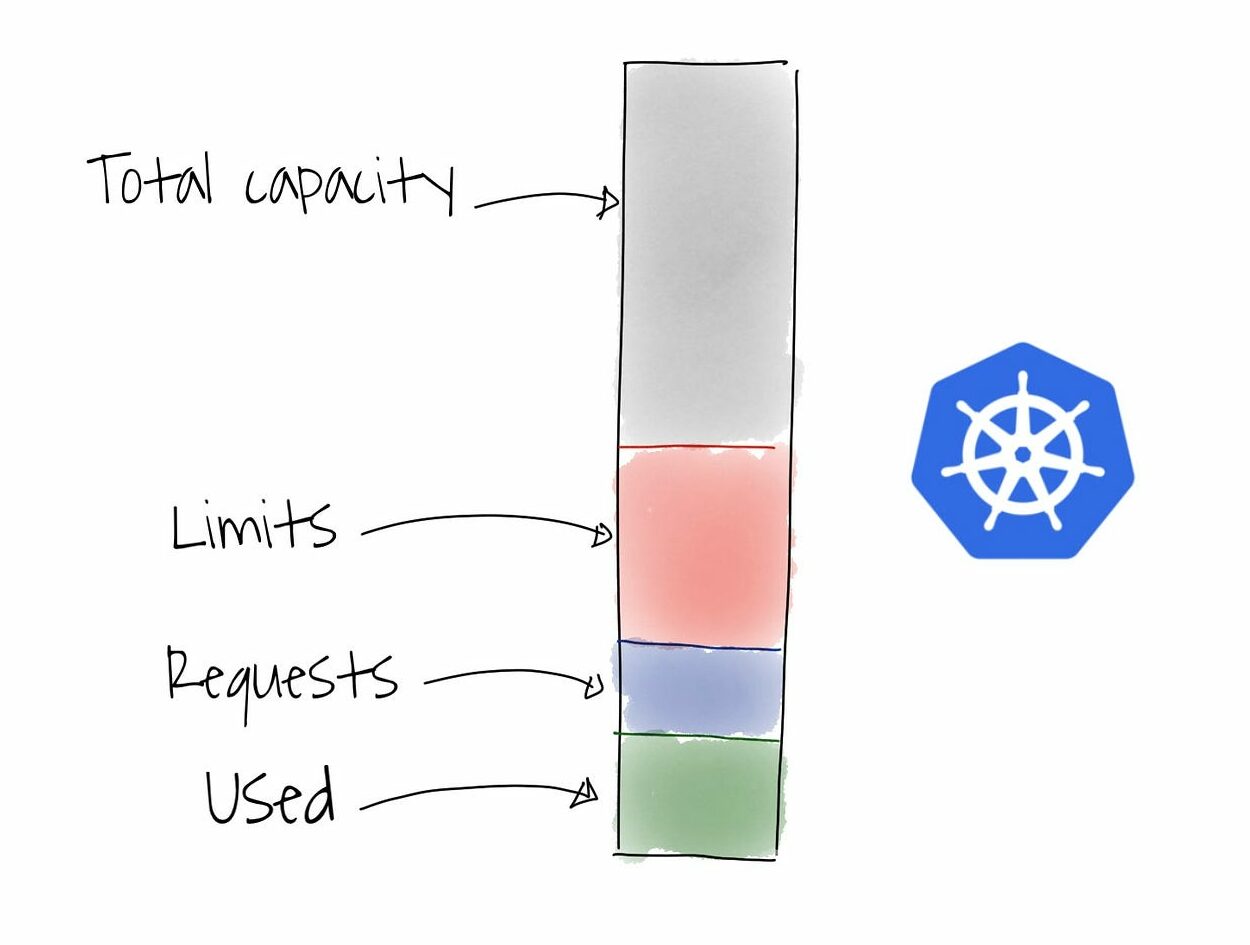
Here's an example: Think of “limits” like your credit card limit and “requests” like your monthly salary. You can't spend more than your limit, but your salary ensures a baseline amount to function.
Pod Priority: The Hunger Games of Kubernetes
Kubernetes employs a priority-based system for allocating resources to pods (a group of one or more containers). Pods with higher priority are guaranteed to receive their requested resources first. If there are insufficient resources, lower-priority pods might be evicted to free up space.
Mechanisms offered by Kubernetes to influence how pods are scheduled and compete for resources:
- Quality of Service (QoS) Classes: These predefined classes (Guaranteed, Burstable, and BestEffort) provide a basic prioritization for pods. Guaranteed pods have the highest priority for resource allocation, followed by Burstable and BestEffort.
- Resource Requests and Limits: Specifying resource requests (minimum needed) and limits (maximum allowed) for CPU and memory in a pod's configuration helps the scheduler prioritize pods that stay within their declared needs. Pods exceeding resource limits can be evicted during resource scarcity.
- Priority Classes: Kubernetes allows assigning priority levels to pods using Priority Classes. Higher priority pods get scheduled first when resources become available. However, system-critical pods have reserved higher priorities than user-defined ones.
When Resources Run Dry: What Happens Next?
If a container exceeds its CPU or memory limits, Kubernetes takes action as follows:
- CPU: The container might experience throttling, meaning Kubernetes reduces its CPU allocation, impacting its performance. In extreme cases, the container might be terminated.
- Memory:If memory limits are exceeded, the container is likely to be terminated due to the risk of crashing the entire node.
Determining and Allocating Resources: A Balancing Act

There's no one-size-fits-all answer to determining resource counts. Here are some factors to consider:
- Application requirements: Analyze your application's typical CPU and memory usage.
- Performance needs: Ensure resource requests are sufficient for smooth operation.
- Cost optimization: Don't overprovision resources; aim for efficient utilization.
Monitoring resource utilization and application performance over time will help you fine-tune your resource requests and limits for optimal results
Scaling Up with Horizontal Pod Autoscaler (HPA)
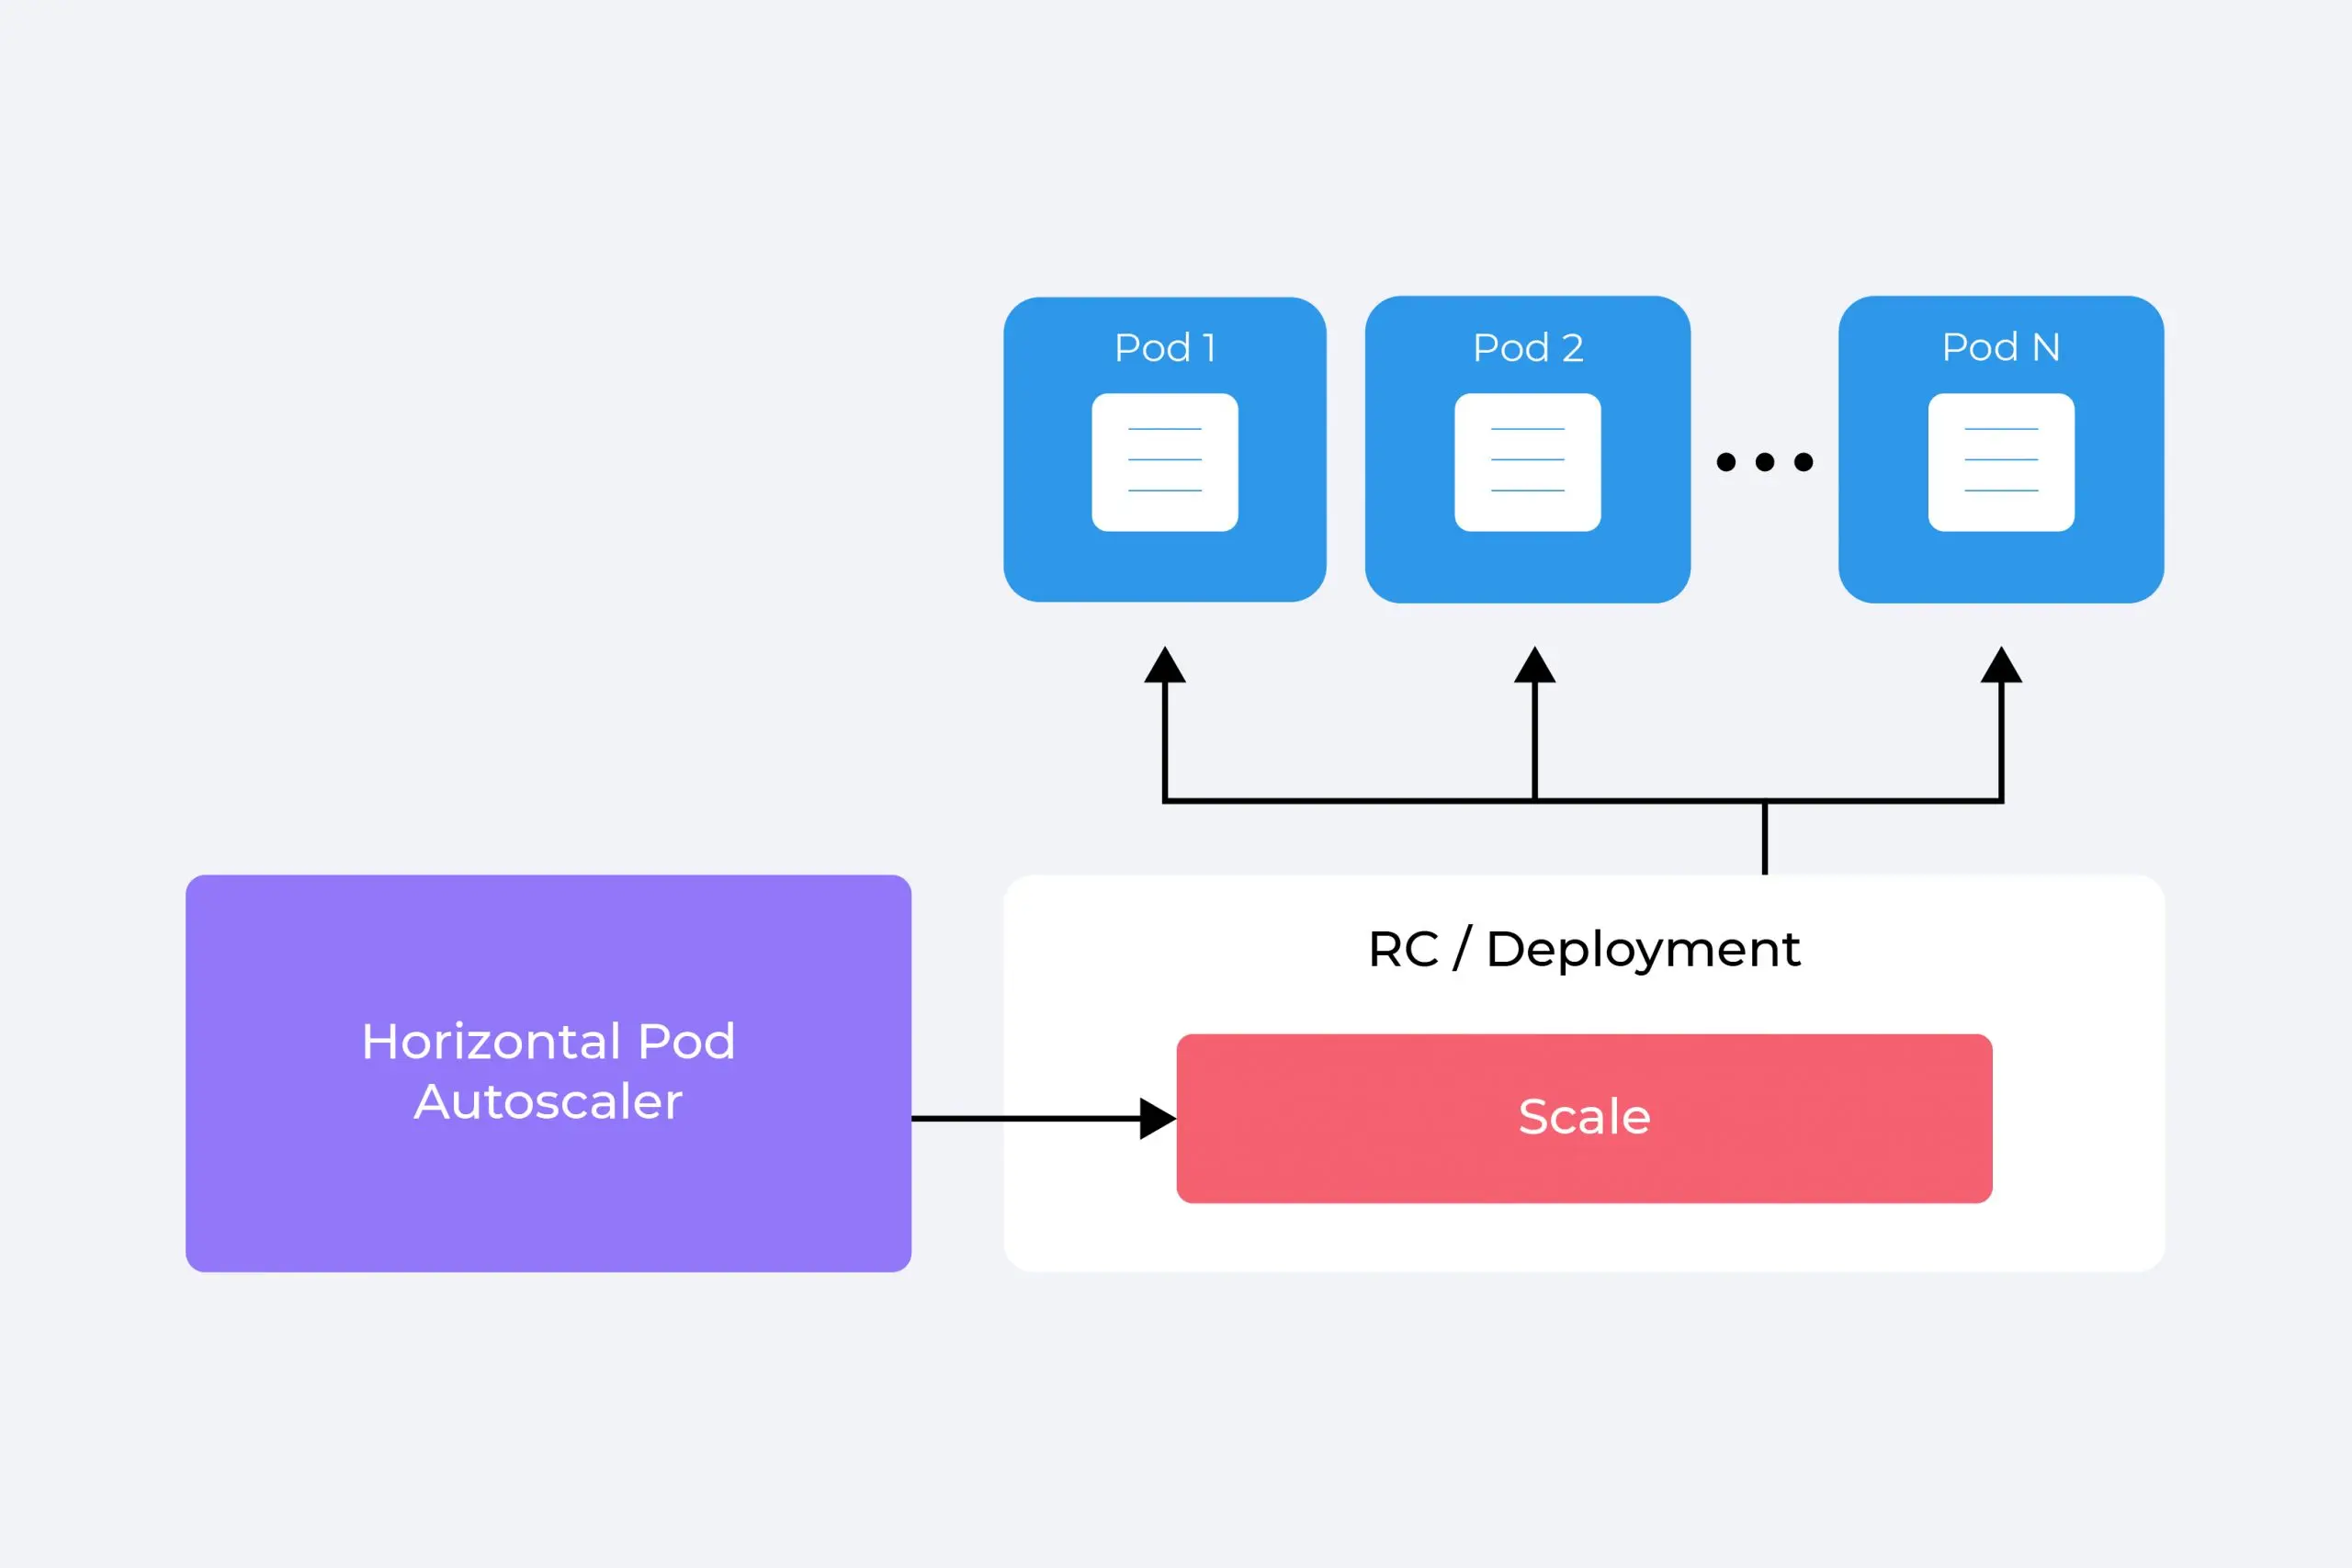
As your application experiences traffic spikes, you might need to scale your resources. Here's where Horizontal Pod Autoscaler (HPA) comes in.
HPA is a Kubernetes object that automatically scales the number of pods in a deployment (a definition for managing pod replicas) based on observed resource utilization (CPU or memory).
Setting up HPA
Here's a simplified view of setting up HPA:
- Define an HPA object referencing the deployment you want to scale.
- Specify the metrics to monitor (CPU or memory).
- Set the target utilization level for the chosen metric.
- Define the minimum and maximum number of replicas the deployment can scale to.
To configure your HPA, craft a YAML file similar to this one.
apiVersion: autoscaling/v2
kind: HorizontalPodAutoscaler
metadata:
  name: <hpa_name> # Replace with your desired HPA name
spec:
  scaleTargetRef:
    apiVersion: apps/v1
    kind: Deployment # Or StatefulSet if you're using that
    name: <deployment_name> # Replace with the name of your deployment
  minReplicas: <min_pod_count> # Minimum number of pods to run
  maxReplicas:<max_pod_count> # Maximum number of pods allowed
  metrics:
  - type: Resource # Metric type based on resource consumption
    resource:
      name: cpu # Metric name (CPU or memory)
      target:
        type: Utilization # Target utilization type
        averageUtilization: <target_utilization> # Desired average CPU utilization (e.g., 80)
How does the HPA work?
The HPA controller continuously monitors the resource utilization of your pods according to the metrics you specify in the HPA configuration. Based on these metrics, the HPA can automatically scale the pod count up (to handle increased demand) or down (to conserve resources when demand is low).
Here's a simplified breakdown of the HPA process:
- The HPA controller checks resource utilization: The controller runs periodically (usually every 15 seconds by default) and checks the resource usage of your pods against the metrics defined in the HPA configuration.
- Metrics are collected: The HPA controller retrieves metrics from the pods either through the resource metrics API (for pod-specific metrics) or the custom metrics API (for any other metrics).
- Scaling decision: Based on the collected metrics and predefined scaling rules, the HPA controller makes a decision to scale the pod count up or down. For example, if the average CPU utilization is consistently high, the HPA would scale up by deploying more pods. Conversely, if the pod utilization is low and the number of pods is above a minimum threshold, the HPA would scale down by terminating pods.
Conclusion
This beginner's guide has equipped you with the fundamentals of Kubernetes resources and scaling. You've learned about CPU, memory, limits, and requests – the building blocks of resource management, explored how Kubernetes prioritizes and allocates resources, and how HPA helps you scale your applications automatically.
The Kubernetes platform offers a vast array of features for resource management and optimization. As you gain experience, delve deeper into concepts like resource quotas, namespaces, and advanced HPA configurations. The official Kubernetes documentations and vibrant community are valuable resources to help you master these advanced techniques.
By effectively managing resources and utilizing scaling mechanisms, you can ensure your containerized applications run smoothly, efficiently, and at scale within the Kubernetes ecosystem. Now, go forth and orchestrate your applications with confidence!